
【Vue.js3】Web初心者がVuexでアンケートアプリを作ってみた!
どうも!ヒグッティです!!
今日はVue.js3のVuexを勉強をしたので備忘録代わりにブログに残しておきます!
私はWeb周りのフレームワークは触ったことがないのですが、
学習コストは低いと思いました。
目次
Vue.jsとは
Web画面を作成するときに利用するフレームワークです。
あとはSPA(シングルページアプリケーション)を作成するときに便利らしいです。
本記事の内容
本記事では以下を解説します。
・Vuex
Vuexとは?
VuexはWeb上で入力した値をブラウザで保存するための仕組みです。CookieやLocalStorageをより使いやすくラップしたものと思っています。
実際にサンプルアプリを作ってみた
百聞は一見に如かずで、簡単なWebアプリを作成しました。
アンケートを入力し、その結果を一覧に出力する単純なアプリです。
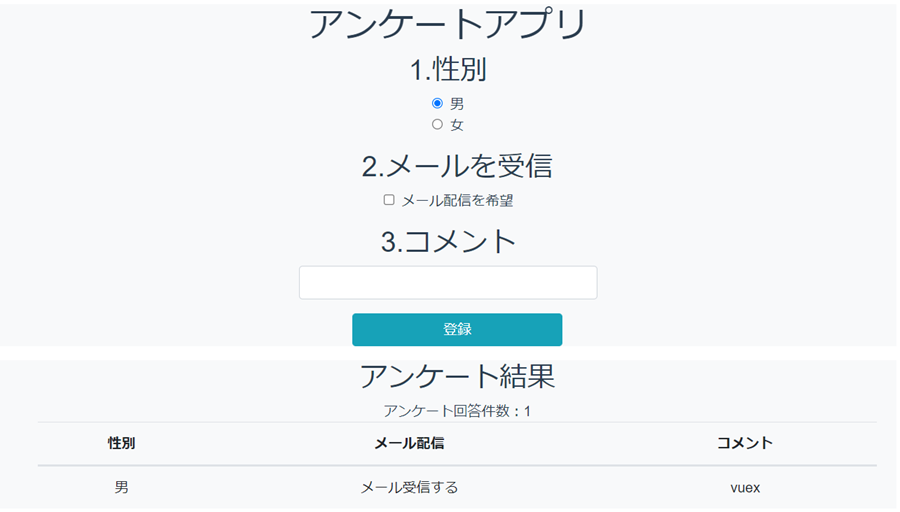
登録ボタンを押すと性別、メール、コメントをVuexでブラウザに保持し、アンケート結果に表示しています。
Vuexの使い方
作成したアプリを元にVuexをまとめます。
Vuexに変数や関数を定義する(store.js)
store.jsで性別、メール、コメントをVuexに保存する設定を記載します。
vuexとvuex-persistedstateをimportし、storeという変数に保存する値や関数などを定義します。
import { createStore } from "vuex";
import createPersistedState from "vuex-persistedstate";
export const store = createStore({
    state:()=>{
        return{
            custmer_info:[],
        }
    },
    mutations:{
        push_info:(state,obj)=>{
            var d = new Date()
            state.custmer_info.unshift({
                sex:obj.sex,
                mail:obj.mail,
                comment:obj.comment,
            })

        },
    },
    plugins:[
        createPersistedState(),
    ],
})
次はstoreの中身についてみていきます。
store
storeは以下の3つに分けています。
- state
使うデータを入れておく場所というイメージです。
- mutations
stateで作成したデータを操作する関数的なイメージです。
- plugins
これはおまじない的なもので、vuexに保存するために必要な行として覚えました。
次からはアプリの中身を見ていきます。
画面表示のソース①
App.vueはただの親コンポーネントです。
<template>
  <div>
    <Les title="アンケートアプリ"/>
  </div>
  <hr>
  <hr>
</template>

<script>
import Les from './components/Les.vue'

export default {
  name: 'App',
  components: { Les },
}
</script>
画面表示のソース②
Les.vueで実際にVuexに保存した値を取得、登録しています。
<template>
  <div class="container col-8 bg-light">
    <h1>{{ title }}</h1>
    <div class="form-group">
      <h2>1.性別</h2>
      <div class="form-check">
        <input class="form-check-input" type="radio" name="exampleRadios" id="exampleRadios1" v-model="data.sex" value="man" checked>
        <label class="form-check-label" for="exampleRadios1">男</label>
      </div>
      <div class="form-check">
        <input class="form-check-input" type="radio" name="exampleRadios" id="exampleRadios2" v-model="data.sex" value="woman">
        <label class="form-check-label" for="exampleRadios2">女</label>
      </div>
    </div>
    <div class="form-group form-check col-12 text-center ml-2">
      <h2>2.メールを受信</h2>
      <input type="checkbox" class="form-check-input" v-model="data.mail_check"/>
      <label class="form-check-label text-left">メール配信を希望</label>
    </div>
    <div class="form-group justify-content-center">
      <h2 >3.コメント</h2>
      <div class="form-group row justify-content-center">
        <input type="text" class="form-control col-4 " v-model="data.msg" />
      </div>
    </div>
    <div class="form-group form-check col-12 text-center ml-2">
      <button class="btn btn-info col-3" @click="regist_info">登録</button>
    </div>
  </div>
  <div class="container col-8 bg-light">

  <div class="form-group form-check col-12  ml-2">
    <h2>アンケート結果</h2>
    <div>アンケート回答件数:{{count_num()}}</div>
      <table class="table text-center">
        <thead>
          <tr>
            <th scope="col">性別</th>
            <th scope="col">メール配信</th>
            <th scope="col">コメント</th>
          </tr>
          </thead>
        <tbody>
          <tr v-for="info in custmer_info">
            <td>{{isSex(info.sex)}}</td>
            <td>{{isMail(info.mail)}}</td>
            <td>{{info.comment}}</td>
          </tr>
        </tbody>
      </table>
    </div>
  </div>
</template>

<script>
import { ref, reactive, computed, onMounted } from "vue";
import { useStore } from "vuex";
export default {
  props: {
    title: String,
    msg: String,
  },
  setup(props) {
    const data = reactive({
      mail_check:false,
      custmer_info: [],
      sex:'man',
      store: useStore(),
    });
    const custmer_info = computed(() =>( data.store.state.custmer_info));
    const count_num = () => {
       return data.store.state.custmer_info.length;
    };

    const isMail = (mail) => {
      var res = '';
      if(mail){
        res = 'メール受信する'
      }else{
        res = 'メール受信しない'
      }
      return res;
    };
    const isSex = (sex) => {
      var res = '';
      if(sex == 'man'){
        res = '男'
      }else{
        res = '女'
      }
      return res;
    };

    const regist_info = ()=> {
      data.store.commit("push_info", { sex: data.sex, mail: data.mail_check, comment: data.msg });
      data.sex = 'man';
      data.mail_check=false;
      data.msg = "";
    };
    return {
      data,
      custmer_info,
      regist_info,
      isMail,
      isSex,
      count_num,
    };
  },
};
</script>
68行目でstore.jsで定義したstoreを利用できるようにしています。
store: useStore(),登録ボタンを押下すると「regist_info」→「store.jsのpush_info」と呼び出されstoreに登録します。
data.store.commit("push_info", { sex: data.sex, mail: data.mail_check, comment: data.msg });store.jsのpush_infoでstate.custmer_infoに対してデータを追加します。
push_info:(state,obj)=>{
            var d = new Date()
            state.custmer_info.unshift({
                sex:obj.sex,
                mail:obj.mail,
                comment:obj.comment,
            })

        },
登録した内容は「custmer_info」で取得しv-forでループし表示しています。
まとめ
Vuexについて簡単なアプリを作って勉強してみました。storeの使い方がわかれば意外と書きやすいですね。
学習コストが低いといわれている理由がわかりました。
大事なことは以下ですね。
store.jsが大事
- stateで使いたいデータを定義する
- mutationsでstateのデータを操作する
- pluginsはおまじない